Wednesday 16 January 2019

Create bootable USB drives the easiest way

Rufus!

Yep, you heard me right. Rufus is the easiest tool to use in creating an iso or a system bootable drive on a CD/DVD or a USB.

Despite its small size, Rufus is all you need. It has a size of approximately 1Mb.

It can be especially useful for cases where:

- You need to create USB Installation Media from Bootable ISOs (Windows, Linux, UEFI, etc.)
- You want to run a low-level utility
- You need to flash a BIOS or other firmware from DOS
- You need to work on a system that doesn't have an OS installed.


Visit https://rufus.ie/ to download the file.


Friday 20 January 2017

Disable Android Apps Running In Background

All you need to do right now is open Developer settings on your device and then:
Make sure that Developer options are ON. Use the toggle to turn it on and click OK once you see the warning.


This is the warning you have to accept by clicking OK.


Swipe down until you see Applications. The location of Applications may differ depending on the device and the version of Android.


These are developer options on my device. Applications are on the bottom.


There are two options that should interest you: Do not keep activities and Limit background processes.
If you want to disable apps and processes from running in the background make sure that Do not keep activities is turned ON and Limit background processes is set to No background processes. Take a look at the screenshot below.


This is how you can easily disable background apps on Android.


Congratulations! You have successfully disabled background apps on Android. Your device battery life should improve a little bit.

However, it may take a bit longer for your phone to open apps (as it has to open each app every time you have to use it instead of returning to it).

This setting may also impact the correct operation of some apps (e.g. alarm clock apps) so be sure that you know what you are doing by disabling background apps on your Android device. Good luck!

iPhone or iPad Camera Not Working

If you face the problem with iPhone camera where you see a black screen when you open your camera app, the first thing you need to do is to check out whether it's a software or hardware issue. Start a Facetime call to one of your friends. Check both the background and front iPhone cameras. If it is the hardware problem, you should contact Apple; if it's software issue you can fix with the potential solutions here.


iPhone iPad Problems – Camera Not Working

Double press the Home button quickly will reveal all running apps in the multitasking manager, scroll right across the icons to find camera, swipe the screen to close Camera app. Open it again to see if it working.

Press and hold the Power buttons simultaneously and wait Apple logo to appear. Let go both buttons to reboot your iPhone. Check Camera app after that.

Go to Settings > General > Reset > Reset All Settings. This won't delete any files or photos.

iPhone Red Screen/Blue Screen

Common iPhone iPad Problems – Red/Blue Screen

A lot of iPhone users get stuck on red or blue screen like the above user, and many of them are complaining about it in Apple Support Communities.


Hard Reset Your iPhone: Press and hold down the Sleep/Wake button and the Home button simultaneously for 10 seconds until you see the Apple logo.

Restore Your iPhone: Press and hold down the Sleep/Wake button to turn off your iPhone. Connect your iPhone to computer via a USB and make sure that your computer is running the latest version of iTunes. Hold down the Sleep/Wake and Home buttons for a few seconds, when the device turns on let go the Sleep/Wake button, but keep holding down the Home button. In the Connect to iTunes screen, you can let go of the Home button. Follow the restore procedure through iTunes.

iPhone, iPad, or iPod touch won‘t turn on


Your device might have a frozen screen that doesn’t respond when you touch it or press buttons. Or maybe your device begins to turn on, but gets stuck during startup. These steps can help.

If your screen is black or frozen

First, try to force your device to restart.
Forcing your device to restart won't erase the content currently on your device.
You can force your device to restart even if your screen is black or your buttons aren't responding.

To force restart an iPhone 7 or iPhone 7 Plus: Press and hold both the Sleep/Wake and Volume Down buttons for at least ten seconds, until you see the Apple logo.

To force restart an iPhone 6s and earlier, iPad, or iPod touch: Press and hold both the Sleep/Wake and Home buttons for at least ten seconds, until you see the Apple logo.

If your device still won't turn on or start up

Plug in your device and let it charge for up to one hour.


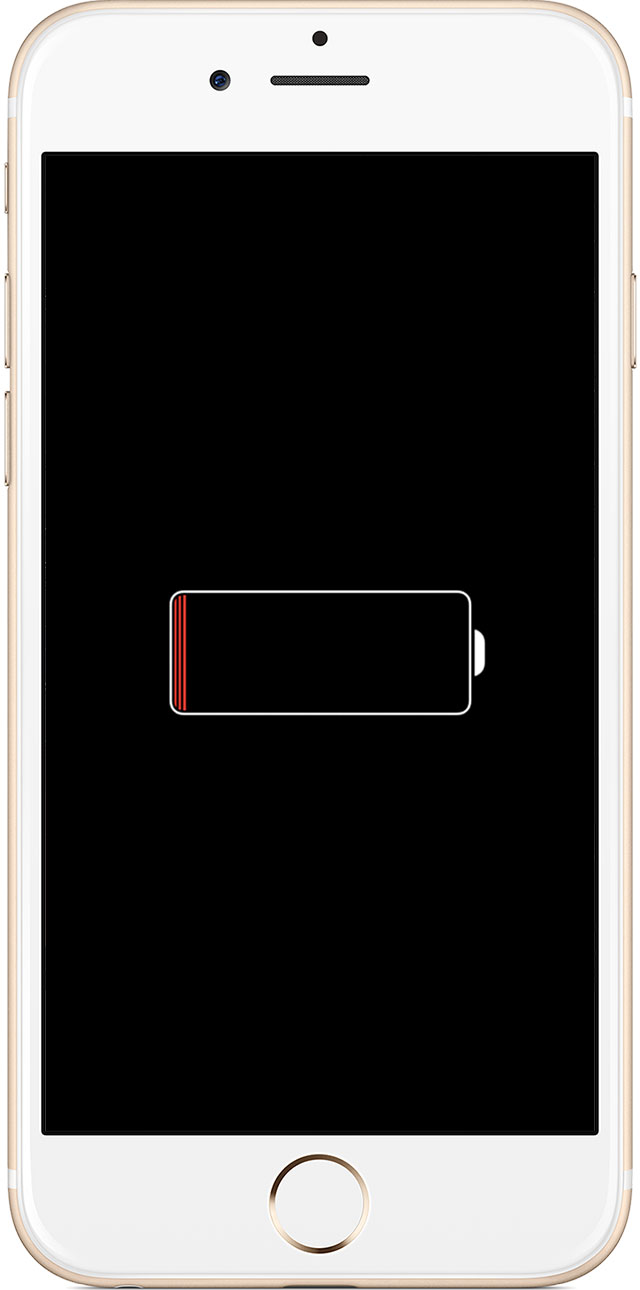
After a few minutes, you should see the charging screen.


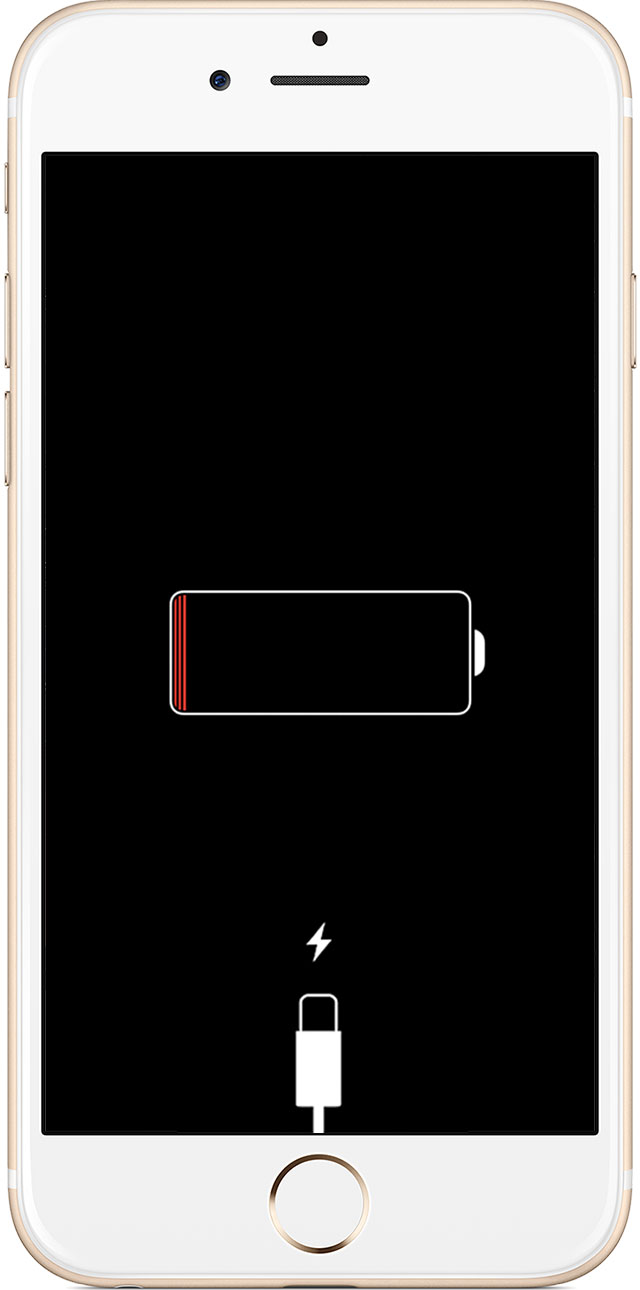
If you don't see the charging screen within an hour, or you see the connect to power screen, check the jack, USB cable, and power adapter. Make sure that everything is plugged in firmly, free of debris, and not damaged. You might want to try a different USB cable or power adapter.

If your device turns on but gets stuck during start up

You might see the Apple logo or a red or blue screen for a long time during startup. Try these steps:
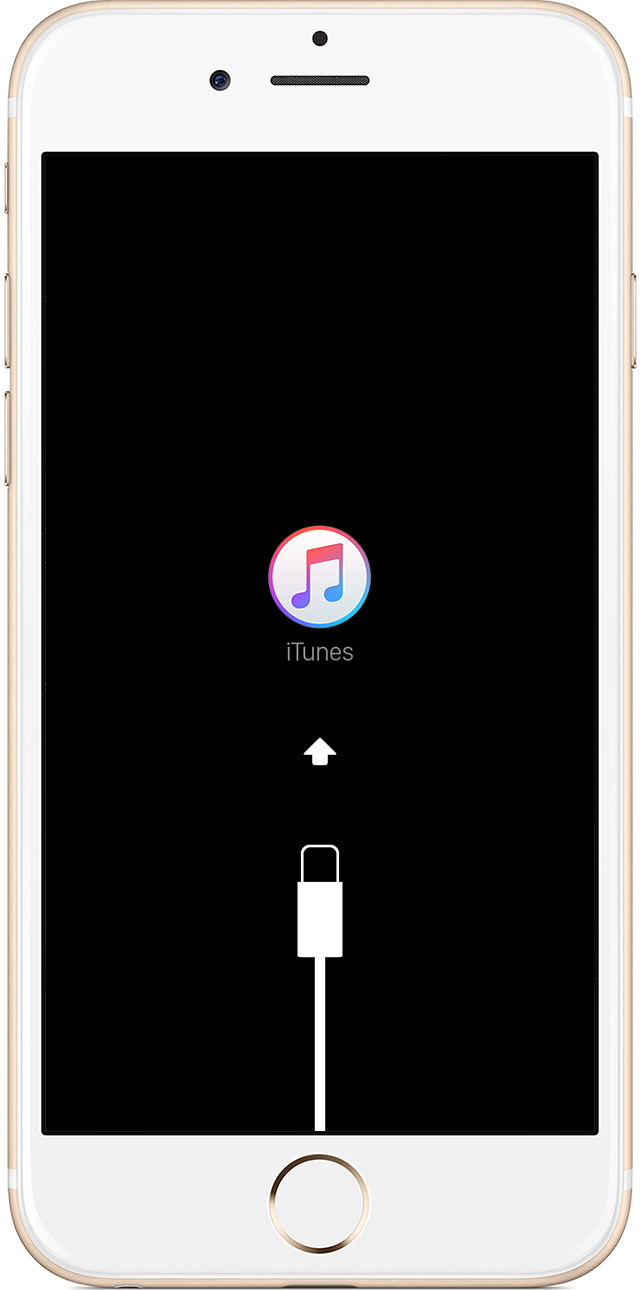
Connect your device to a computer and open iTunes. If you don't have a computer, you can borrow one, or go to an Apple Retail Store or Apple Authorized Service Provider for help.
While your device is connected, force it to restart.
On an iPhone 7 or iPhone 7 Plus: Press and hold the Sleep/Wake and Volume Down buttons at the same time.
On an iPhone 6s and earlier, iPad, or iPod touch: Press and hold the Sleep/Wake and Home buttons at the same time.
Don't release when you see the Apple logo. Keep holding until you see the recovery mode screen.

When you get the option to restore or update, choose Update. iTunes will try to reinstall iOS without erasing your data.


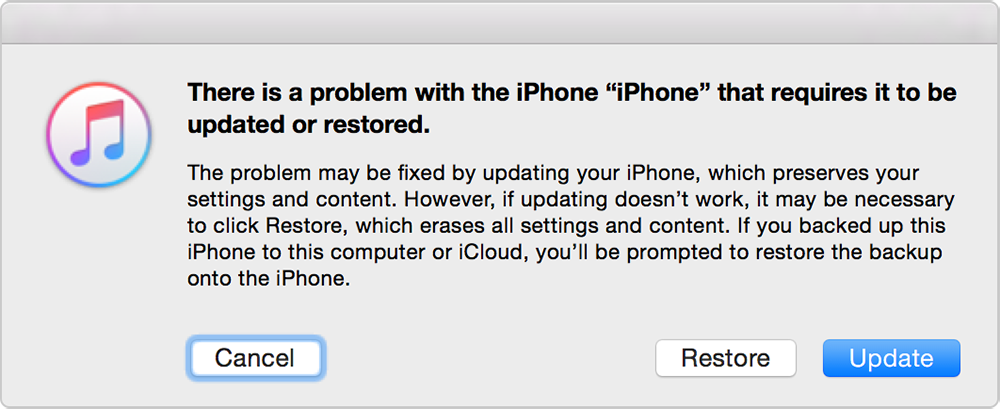
iTunes will download the software for your device.

Cleanup your Mac

Spilling liquids on your Mac is a nightmare scenario. With a laptop, grab it quickly being wary of any non-MagSafe cables and turn it upside down, allowing as much liquid as possible to run off; then shut it down and leave it in a warm (not hot) and dry place to recover.

Clean off any residue with a cotton bud slightly dampened with water. With desktop Macs it's usually the keyboard that gets it. Unplug, turn upside down, then assess the damage.

If the liquid has gone right inside and is something that won't easily evaporate away, like a fizzy drink or beer, consider running the whole thing under the tap; this shouldn't cause permanent damage as long as you dry it out fully, leaving it somewhere warmish for a day or so, before reconnecting.

This is, of course, entirely at your own risk. On a less mission-critical theme, white MacBooks can get grubby quickly. A clean cloth lightly dampened with plain water is safe to use.

Thursday 19 January 2017

How to Disable extensions on boot

Symptoms: 
Apple computer does not boot or start up to the desktop.

Causes:
When extensions prevent a computer from booting, it's frequently due to an application that was installed or a login app that's causing the lockup.

Solution:
Power on or restart the computer while holding down the [shift] key. Continue to hold down the key to disable extensions and login items from loading during the boot process. From a desktop with extensions disabled, "safe mode" will allow the end user to remove the offending app and boot normally.